|
image from glowingvale.com WOW I have had many gardeners come and it is lots of fun for me to see all of you. You don’t need to worry I have lots of plants left. In fact, just started moving out of the greenhouse which is very full. Thursday May 16, the third load of perennials will be dropped off. The first wagon is full where will I put them? We have the shade cloth on so the greenhouse is very comfortable.
I can’t say it enough how nice the plants all look. Just so ready to plant in your garden. I am glad to get more outside so they are hardened off and don’t have that greenhouse wilt. They are ready to go into your gardens, and start to grow. I still have seed potatoes, onion sets and onion plants, along with fingerling potatoes. Bulk seeds at .25 a teaspoon or .50 a tablespoon depending on the vegetable seeds you are getting. Trees and bushes look great. We have annuals and vegetables in single packs, put have more in a small 4 pack or large 4 pack. Get more plants for your money. It all depends on the plant and to be honest with you the cost of that plant for me to plant. Stop in and see what we have. Monday thru Saturday 9-6, Sunday 1-6. See you. Back to the garden program on May 8th in Greene. Another question asked “ Why doesn’t my hydrangea bloom.” I had no idea so here is what I found out. First I would have asked what kind is it. You can look at the different kinds and then find the reason why not blooming. Do you know the answer? Here's Why Your Hydrangea Didn't Bloom By Megan Hughes Your hydrangeas not blooming around the time you see other hydrangeas with flowers will make you wonder, "What's going on?" If your plants look generally healthy, the good news is that the problem can usually be remedied, and you'll enjoy bouquets of flowers from your hydrangeas again. Here are seven common reasons why you'll see hydrangeas not blooming. Once you figure out what's causing your plant not to flower, use the tips in this guide to fill your garden with plenty of hydrangea flowers again. How to Make Hydrangeas Bloom More, Depending on Type 1. Pruning at the Wrong Time Pruning at the wrong time of year is the most common cause of hydrangeas not blooming. Pruning at the right time begins with determining what type of hydrangea you are growing. Here’s a trick: if your hydrangea doesn't bloom in spring and instead blooms exclusively in mid- to late summer, it is likely a smooth hydrangea (Hydrangea arborescens) or panicle hydrangea (Hydrangea paniculata), and it produces flower buds in spring. Because smooth and panicle hydrangeas develop flower buds and bloom all in the same growing season, they can be pruned in very early spring. Hydrangeas that bloom in spring and early summer are likely bigleaf hydrangea (Hydrangea macrophylla) or oakleaf hydrangeas (Hydrangea quercifolia). These hydrangeas bloom from flower buds that formed the previous summer or fall. The best time to prune bigleaf and oakleaf hydrangeas is early summer, right after they finish blooming. What to do: Prune your hydrangea at the right time, and you’ll avoid cutting away flower buds. If you do make a pruning mistake, let the plant bounce back and bloom the following season before doing any more pruning. 2. Winter Injury Oakleaf and bigleaf hydrangeas form flower buds in late summer and fall for the following spring. The tender flower buds must survive winter to bloom in spring. Blasts of extreme cold and ice damage can kill flower buds. In Zone 5 and below, susceptible hydrangeas flower best with winter protection. Hydrangeas in Zone 6 can benefit from winter protection, too. Dry conditions in fall also contribute to winter damage and subsequent lack of flowers. Any type of hydrangea that goes into winter with dry stems and roots is likelier to experience winter injury. What to do: First, water plants deeply in the fall. Protect tender flower buds of susceptible hydrangeas from extreme cold. You can do this by building an insulative cylinder around the shrub in late November, using sturdy stakes and chicken wire or burlap. Fill the cylinder with leaves or straw. Remove the cylinder and leaves in early spring. 3. Deer Damage Tender stems and fleshy buds serve as a welcome snack for deer. Hydrangeas are commonly browsed by deer year-round. Winter browsing will eliminate flower buds on oakleaf and bigleaf hydrangeas, while browsing during the growing season will strip away the flower buds of panicle and smooth hydrangeas, resulting in hydrangeas not blooming when you expect them to. What to do: Protect plants with a barrier or a deer-repellant spray. Barriers, such as a fence or netting-style wrap, are often effective but unattractive. Deer repellant is invisible and usually effective. Sprays must be diligently reapplied after every rain. If deer become insensitive to a particular spray, try a different brand. 4. Too Much Nitrogen Nitrogen fertilizer promotes deep green leaves but few flowers. Avoid fertilizing your hydrangea with a high-nitrogen fertilizer. Even if you don’t fertilize your hydrangea, it can still be affected by excessive nitrogen because of nearby turf. Lawn fertilizer is often high in nitrogen and can wash into the soil around hydrangeas. What to do: To encourage flower production, fertilize hydrangeas with a product high in phosphorus rather than nitrogen. 5. Late Freeze A late freeze in spring can kill developing flower buds. Hydrangeas are especially susceptible to a late freeze if the preceding growing days have been mild and the hydrangea is actively growing. What to do: Pay close attention to the weather forecast in spring. If a late freeze is predicted, protect your plants from frost with sheets or blankets. Secure the cover to the ground with brick, rocks, or anything heavy. 6. Not Enough Light Hydrangeas grow best in bright morning light and part shade in the afternoon. Plants growing in too much shade will result in hydrangeas not blooming on elongated, floppy stems. What to do: Move a hydrangea planted in too much shade to a brighter growing location. The best time to transplant a hydrangea is early spring. 7. The Type of Hydrangea Some types of hydrangeas have a reputation for being finicky when it comes to blooming, even when there is no sign of winter damage, deer have not munched the plant, pruning was done at the right time, and excessive nitrogen is not the problem. One year, they unfurl flowers with abandon; the following year, only a blossom or two will adorn their leafy stems. Bigleaf hydrangeas most often fall into this category of unpredictable bloom patterns. Additionally, if you have a potted florist hydrangea, these plants have been forced into bloom out of season (Mother's Day hydrangeas, for example) and are intended to bloom once indoors. These hydrangeas are unlikely to rebloom even if you plant them outdoors. What to do: Choose a hydrangea that generally blooms regularly, such as panicle, smooth, or oakleaf types. Get the Most Out of Your Cut Hydrangeas Cut hydrangeas are possibly the biggest bonus of growing hydrangea plants in your garden. Their colorful and abundant blooms bring a happy detail to indoor spaces, but they are notorious for lasting for a brief time. To keep your hydrangeas fresh for longer, use these tips: Submerge your blooms in room-temperature water for 30 minutes. Hydrangeas are able to absorb water through their flowers, so this trick gives them the moisture boost they may need. Stick the stem ends in boiling water for about 30 seconds, then plunge them into cool water to revive the blossoms. Cut the stems at an angle and change the water every day to keep your hydrangeas fresher for longer. You can also try dipping the stems in alum to keep them free of bacteria. Taken from https://www.bhg.com/hydrangeas-not-blooming-7496888 Till next time this is Becky Litterer, Becky’s Greenhouse, Dougherty Iowa beckmall@netins.net 641-794-3337 cell 641-903-9365
0 Comments
How to get rid of Japanese beetles. Question asked at a gardening session. Hope this helps.5/9/2024 image from ag.ndsu.edu Hi, rainy day in Dougherty and North Iowa. Mason City had 2” of rain last night, I don’t know what we got but it is wet out. I was at Greene Library last night ( May 8th) for a gardening program. What a great crowd. I knew many of the guests and I think we had fun. I did anyway. Question was asked how do I get rid of Japanese Beetles? I didn’t know, but when I went to the Old Farmer’s Almanac site look what I found. There is a product to spray on the plants for them, and do it early. Also a product to put on the ground to take care of the grubs which what they hatch from. Take a read, and hope it helps Renae.
How to Get Rid of Japanese Beetles in the Garden Prevent Japanese Beetles from Eating Your Plants! By Catherine Boeckmann Japanese beetles are iridescent green insects that pose a big threat because they feed on a wide variety of plants. The trick is to start early. What Are Japanese Beetles? Japanese beetles (Popillia japonica) do not discriminate regarding what types of plants they feed on, though they do have favorites (like roses). In fact, they are classified as pests to hundreds of different species. They are one of the major insect pests in the Eastern and Midwestern United States, causing monumental damage to crops each year. To manage Japanese Beetles in yards and gardens, the trick is to start early! Once these insects are present in large numbers, the problem is very difficult to manage. Start at the grub stage! BTG or Bacillus thuringiensis galleriae (e.g., products such as grubGONE!) uses naturally-occurring soil bacteria. This bacillus ONLY targets certain lawn insect pests, such as Japanese Beetle grubs, before they become destructive adults. The grubs ingest the spores and the natural yet powerful BTG proteins as they feed in the soil. It is as effective as a chemical pesticide and works within days to weeks of application but is NOT toxic to beneficial insects, such as earthworms, bees, and pollinators; it will not harm people, pets, animals, or plants. BTG will kill not only Japanese Beetle grubs but also a variety of other destructive beetle larvae and grubs, such as Chafers, Oriental Beetles, and Billbugs, throughout the spring through fall seasons. To deter an infestation of adult beetles and kill the beetles that do infest your edible or ornamental plants, you can use BTG or Bacillus thuringiensis galleriae as a spray (e.g., product beetleGONE!). Like with the grubs, BTG effectively kills the adult beetles through a combination of the BTG protein and spores. One key to success is to start applying early: at the first signs of the adult beetle. Farmers and growers have stated that they believe BTG may reduce the attraction by early-arriving beetles of more beetles by inhibiting the effectiveness of the early arrivals’ use of their beetle-attracting pheromones. This product can be mixed in water and sprayed on edible garden plants, ornamental plants, and trees to kill Japanese Beetle adults or put into turf to kill the grubs. It can also be used dry as a mix into potting or garden soil to control beetle grubs. The product is registered with a zero-day pre-harvest interval, therefore, you can treat for beetles and pick your food the same day. There are no label restrictions for use around bees or flowering plants; therefore, it can be safely used while pollinators are active. There is also no toxicity to fish or aquatic life. 2. Hand pick early: Look for beetles in mid-to-late June or early July. In the early morning or evening, when beetles are more sluggish, knock beetles into a bucket of soapy water. Yes, it’s time-consuming, but it’s also the most effective way to kill these pests. Just be diligent. When you pick them off, put them in a solution of 1 tablespoon of liquid dishwashing detergent and water, which will cause them to drown. Do this daily, as the chemical trail of beetles attracts more beetles. 3. Protect with row covers: Use row covers during the 6- to 8-week feeding period that begins by mid-to-late June in the North and mid-to-late May in the South. Row covers will keep the pests out, but they will keep pollinators out, too; be sure to remove netting or covers if your crops need to be pollinated. Do not cover plants in bloom that require pollination (i.e., fruits); after the plant sets fruit, then cover it with netting. 4. Spray Neem oil if early: Deter feeding by adult beetles by spraying plants with Neem oil, which contains potassium bicarbonate. Adult beetles ingest a chemical in the neem oil and pass it on to their eggs, and the resulting larvae die before they become adults. Neem oil is effective for several days, but repeat applications are needed, especially after rainfall. Neem oil is not effective once you have beetles in large numbers. Neem is low risk to bees and other beneficial insects but can be harmful to fish and aquatic life, so don’t use it near lakes, rivers, and water. 5.Do NOT use traps. They attract beetles, but research has proven that more beetles fly toward the traps than are caught. You’ll be pulling beetles in from all over town and end up with a worse problem. 6. Choose the right plants: There are some that Japanese Beetles seldom damage, such as boxwood, clematis, chrysanthemum, conifers, daylily, geranium, ginkgo, Japanese tree lilac, forsythia, common lilac, magnolia, red and silver maple, oak, white poplar, redbud, rhododendron, and yew. See our list of the Best and Worst Plants for Japanese Beetles. Dispersing the beetle’s favorite plants throughout the landscape, rather than grouping them together, can also help. 7. Introduce natural enemies: You can also attract native species of parasitic wasps (Tiphia vernalis or T. popilliavora) and flies to your garden, as they are predators of the beetles and can be beneficial insects. They will probably attack the larvae, but they are not very effective in reducing the overall beetle population. 8. Use companion plants: Avoid attracting beetles with companion planting. Try planting garlic, rue, or tansy near your affected plants to deter Japanese beetles. (Roses love garlic is a popular expression.) All herbs and other aromatic plants make wonderful companions. Scented geraniums (Pelargonium), rue (Ruta), feverfew (Tanacetum), parsley (Petroselinum), and thyme (Thymus) all may help ward off Japanese beetles as well as aphids. Try ornamental and culinary sage (Salvia), anise-hyssop (Agastache), Russian sage (Perovskia), lavender (Lavandula), yarrow (Achillea), oregano (Origanum), catmint (Nepeta) and calamint (Calamintha). Four-o’clocks (Mirabilis) and larkspur (Delphinium) are said to act as decoys by attracting rose-loving Japanese beetles to eat their poisonous leaves, but they do not kill the beetles. 9. Beware of insecticides: If you wish to use insecticides, speak to your local cooperative extension or garden center about approved insecticides in your area, and be aware of whether you’re killing the very pollinators that bring fruit and flowers! For example, Chlorantraniliprole (Acelepryn®) provides two to four weeks of protection and is low risk to bees. But most dusts or sprays are highly toxic to honeybees, native bees, and other pollinators. If application of these materials to plants is necessary during the bloom period, do not apply during hours when bees are visiting the flowers (late morning through mid-day). Apply sprays in the morning, never in full sun or at temperatures above 90ºF. If your plants start to wilt, rinse the leaves immediately with clean water. Nip rose buds and spray rose bushes: Note that insecticides will not fully protect roses, which unfold too fast and are especially attractive to beetles. When beetles are most abundant on roses, nip the buds and spray the bushes to protect the leaves. When the beetles become scarce, let the bushes bloom again. Timeliness and thoroughness of application are very important. Begin treatment as soon as beetles appear, before damage is done. Information about these insects. Before the beetle’s accidental introduction to the United States in the early 1900s, the Japanese beetle was found only on the islands of Japan, isolated by water and kept in check by its natural predators. In 1912, a law was passed that made it illegal to import plants rooted in soil. Unfortunately, failing to implement the law immediately allowed the Japanese beetle to arrive in this country. Most entomologists agree that the beetles entered the country as grubs in soil on Japanese iris roots. In 1916, these coppery-winged pests were first spotted in a nursery near Riverton, New Jersey. By 1920, eradication programs were dropped; the beetle proved too prolific and widespread. How to Identify Japanese Beetles Japanese Beetles are ½ inch in length with distinct metallic blue-green heads. They have copper-colored backs, tan wings, and small white hairs lining each side of the abdomen. Japanese beetles usually feed in small groups. Prior to becoming adult beetles in late June, they are 1-inch-long, white, c-shaped grubs that live in the soil and feed on the roots of many plants. These grubs are often a problem in lawns. Once adults, Japanese beetles live only 40 days, but they are voracious. Japanese beetles attack plants in groups, which is why the damage is so severe. Most feeding starts in mid-to-late June in the North and mid-to-late May in the South. Signs of Japanese Beetle Damage Japanese beetles feed on a wide variety of flowers and crops (the adult beetles attack more than 300 different kinds of plants), but in terms of garden plants, they are especially common on roses, as well as beans, grapes, and raspberries. Here’s what to look out for: Unhealthy, Brown Patches in Lawn First come the Japanese beetle grubs (larvae), which damage grass when overwintering in the soil. The grubs feast on the roots of lawn grasses and garden plants. This can cause brown patches of dead or dying grass to form in the lawn, which will pull up easily thanks to the weakened roots. Skeletonized Leaves and Flowers Then come the adult Japanese beetles which chew leaf tissue from between the veins, leaving a lacy skeleton. You’ll know right away when you see leaves that are “skeletonized” (i.e., only have veins remaining). (Mexican Bean Beetles can also leave foliage skeletonized, though, so be sure to identify the beetle by their appearance as well.) Taken from https://www.almanac.com/pest/japanese-beetles Till next time this is Becky Litterer, Becky’s Greenhouse, Dougherty Iowa beckmall@netins.net 641-794-3337 cell 641-903-9365 taken from Becky's Greenhouse Stinker says HI..... image from windyacresnaturalfarmblogspot.com Good day fellow gardeners. Sun is shining after we had rain last night with thunder, lightning, and wind. Mild temperature out 69 at 1:35 PM. tonight a low of 46. Lovely spring day.
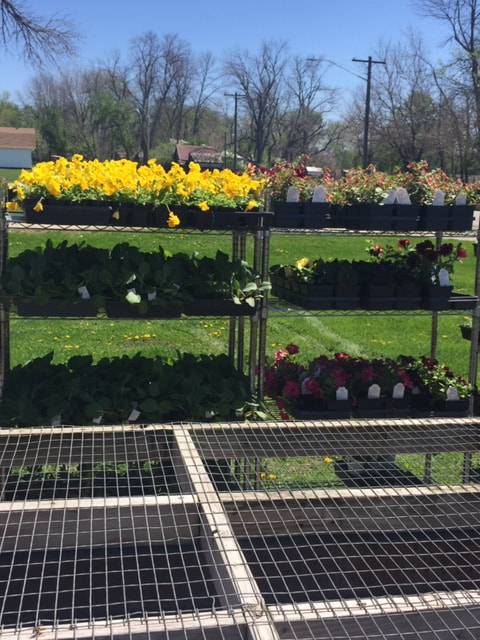
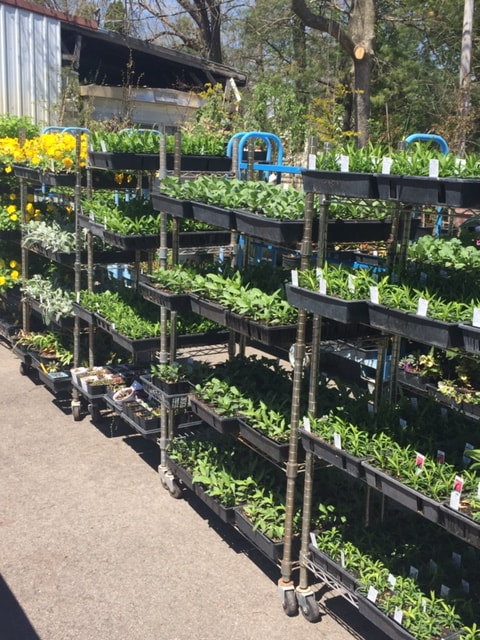
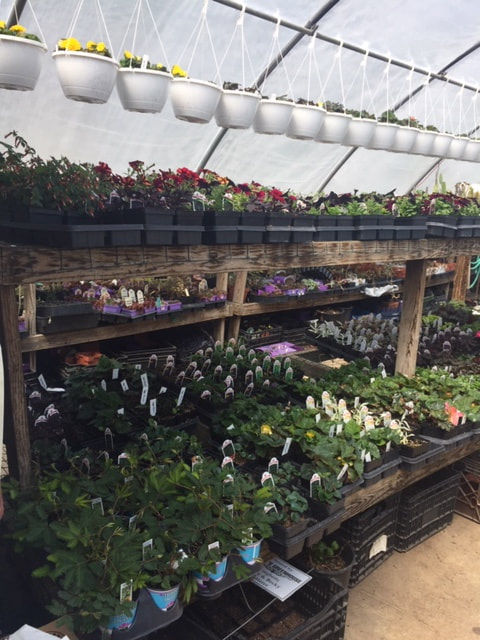
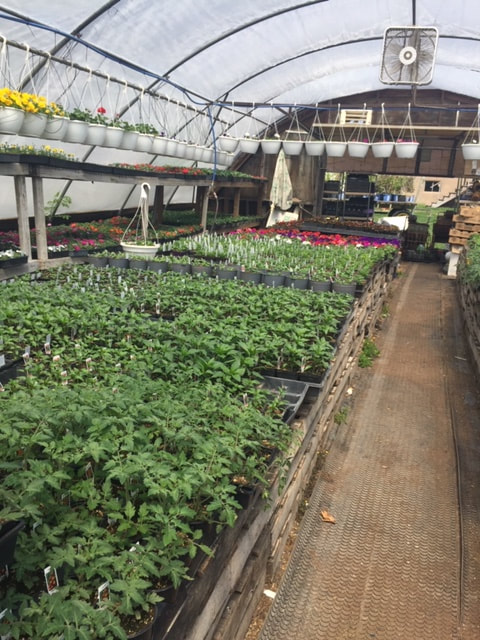
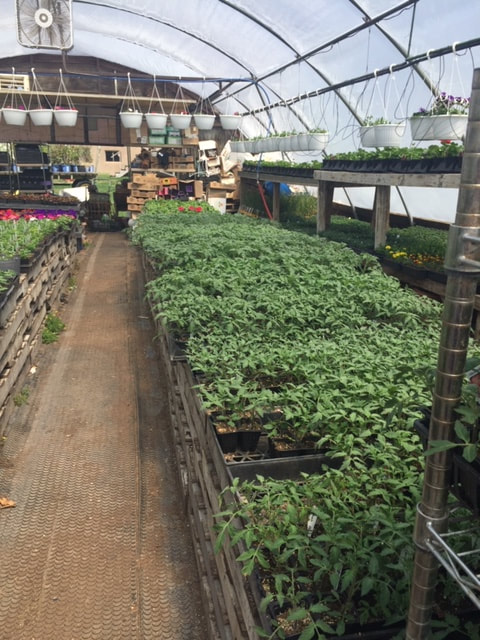
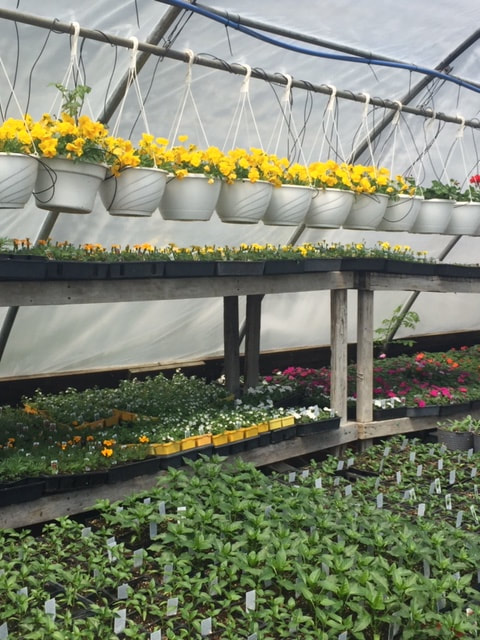
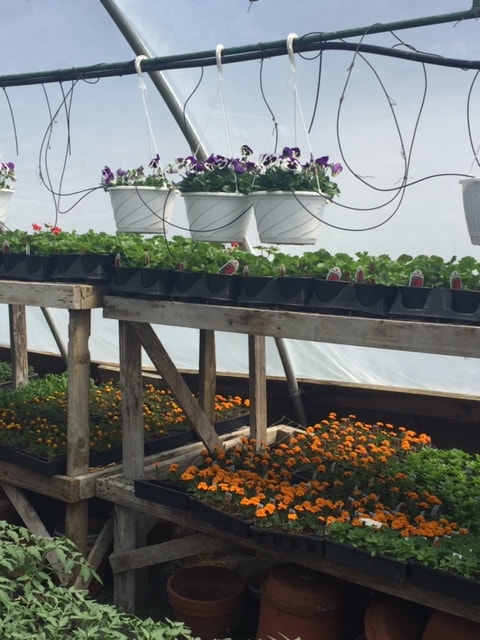
First thing first I found asparagus roots, and they are ordered 100 plants. They will be shipped here next week. Call to make sure when they come if you were askig for asparagus. feature Coleus plants today. Height: 20 inches Spacing: 14 inches Kong Mosaic Coleus' attractive large serrated pointy leaves remain light green in color with showy creamy white variegation and tinges of dark red throughout the year on a plant with an upright spreading habit of growth. This is a relatively low maintenance plant. The flowers of this plant may actually detract from its ornamental features, so they can be removed as they appear. Deer don't particularly care for this plant and will usually leave it alone in favor of tastier treats. It has no significant negative characteristics. Mass Planting Border Edging General Garden Use Container Planting Hanging Baskets Kong Coleus will grow to be about 20 inches tall at maturity, with a spread of 18 inches. When grown in masses or used as a bedding plant, individual plants should be spaced approximately 14 inches apart. The Kong series coleus (Solenostemon scutellarioides), a variety released in 2004, won't thrive in full sun. The brilliantly colored leaves – described as being as big enough to cover your face – prefer shade with only a touch of morning sun. Kong Coleus is a fine choice for the garden, but it is also a good selection for planting in outdoor containers and hanging baskets. With its upright habit of growth, it is best suited for use as a 'thriller' in the 'spiller-thriller-filler' container combination; plant it near the center of the pot, surrounded by smaller plants and those that spill over the edges. Note that when growing plants in outdoor containers and baskets, they may require more frequent waterings than they would in the yard or garden. Give them a try. Taken from https://www.gardenguides.com/80673-care-kong-rose-coleus.html Till next time this is Becky Litterer, Becky’s Greenhouse, Dougherty Iowa beckmall@netins.net 641-794-3337 cell 641-93-9365 images from Becky's Greenhouse outside image from inside Becky's Greenhouse All the pictures here is what we have grown out of this greenhouse. Looking good, I would say.
I have been asked if I can get certain plants. Here is what I have been asked for and they are here. Hibiscus is the hardy kind, we have Cherub light pink, Purple Hearts red/dark foliage. Clematis Montana Ruben Pink, Piena Elegans small double rose purple, Purple star. Hollyhocks Purple rain, and radiant rose. Do you have wave petunias? Yes, in a large 4 pack and many different colors. Peony Felix Crousee, Pink Hawaiian Corla, Raspberry charm, Red Charm. Raspberry bushes in Heiritage and Nova. Rhubarb plants will be here next week. (Week of May 5th )We have Lemon grass. I will be ordering perennials at least next week,( week of May 5th) so if there is something you are looking for just ask, and I can see if I can get it. The perennials made it yesterday. Trees/shrubs are here. Annual packs have grown and look really good. ( if I say so myself). Tomatoes and pepper plants have an awesome thick stock for planting in your garden. We have lots of premium annuals from Proven Winners to Plant Peddler( which we have grown here, just the plug came from these growers) and also from Swift Greenhouse. As I have always said to you, most of the annuals and vegetables have been grown in our greenhouse. With that the wagons will be filled, and the greenhouse is still full. We are growing more so need to move out more plants. We have grown geraniums, spikes, hanging baskets. Our bedding annual plants are in a 4 pack two sizes. Super packs or regular packs…we strive to save you money and not having everything in single pots. We have planted some of the annuals in quart size pots so they are ready to go into your garden fully grown. Succulents are growing and still planting more. They start at $1.00 and more. Seed potatoes, onion sets, onion plants, bulk vegetable seeds most of them .25 per teaspoon or the tablespoons .50 savings for you. Just planted some carnivorous plants. As you can see, we have a variety of plants for you. More than I have written about. I will be glad to see you. See you soon. When you come remember your punch card as we honor them forever. For $100, you get $7.50 off. Hours are Monday thru Saturday 9-6, Sunday 1-6. Till next time, this is Becky Litterer, Becky’s Greenhouse, Dougherty Iowa beckmall@netinns.net 641-794-3337 cell 641-903-9365 image from quotesgram.com It is cool today as the temperature at 2:30 is 56 degrees but feels like 53. It is cloudy and still raining a bit. Tonight, low will be 39. This is a typical spring day. Stay warm. Now next week, it will be warmer than normal, so I will be saying stay cool.
Slowly we are getting the plants outside that are ready. Now they are on tall racks, and hopefully on next couple of days I will get them on the long wagon racks. Greenhouse is full, and still more planting to do. I just told Larry I am really pleased on how the plants look. They look great. For you the gardener when you come it will be the Bibical Way, “Seek and you shall find.” Yes, we have onions. We have red, white and yellow onion sets. This year they came in large bags, so we have rebundle them into small bags. I am so pleased on how they are. Nice size and so much better than buying them in little bags. I think you will think the same thing. We have onion plants. Here is the description of what we have. Patterson Onion Plants Yellow, globe shaped, slightly pungent, hybrid Size Potential: 3-4″ Storage Potential: 8-10 months Days to Harvest: 110 Yellow, Storage, Hybrid Patterson continues to provide the longest storage potential our varieties offer. This variety provides great storage potential, firmness, large size potential, great uniformity, and high yield. Red Candy Apple Onion Plants Deep Fed, Flat Globe Shape, Sweet, Hybrid Size Potential: 3″ Storage Potential: 2-3 months Days to Harvest: 85-95 Red, Sweet, Hybrid Red Candy Apple has proved to be a reliable red intermediate day onion year after year. Although slightly smaller in size, Red Candy onions can be pushed to grow larger in long days areas with additional nitrogen. Allow to grow to full maturity as Red Candy Apple finishes strong. When planted in short and intermediate day areas, it produces larger bulbs. Makes a great red bulb to be sold early at the farmers’ market in all areas. What it lacks in size, it will make up in appearance and flavor. Contains a higher concentration of quecetins, an antioxidant compound that helps delay or slow damage to the cells and tissue of the body. Sterling Onion Plants Dixondale Farms exclusive! White, globe shaped, mildly pungent, hybrid Size Potential: 5″ Storage Potential: 6 months Days to Harvest: 100-110 Description Sterling is a consistent performer with tall, vigorous tops that may help protect against sun scalding. Its uniform bulbs range in size from jumbo to colossal. Sterling is resistant to foliar disease and bolting. When you come and you ask how do I grow big onions? Or grow the onion that you eat small? I will show you the way to plant to get each of them. Till next time this is Becky Litterer, Becky’s Greenhouse, Dougherty Iowa beckmall@netins.net 641-794-3337 cell 641-903-9365 image from Freepik image from Pinterest
image from gardenerspath.com. Good morning. Cold again last night. We had plants outside but put them away as it was predicted to get down to 37. During the day on Monday with the wind, and clouds it was cold out. Soon May 1st and then we can get going in our gardens. Temperature is 40 at 7:15 AM high today of 78 and low of 40 tonight. BUT we are in a slight chance of storms this afternoon with hail and wind. I had moved the tall racks into the greenhouse, they will come out but will go back in when the weather is like “wind and hail.” Soon we will be filling up the long wagons, and then they can go into the east greenhouse if weather is bad. Stay safe.
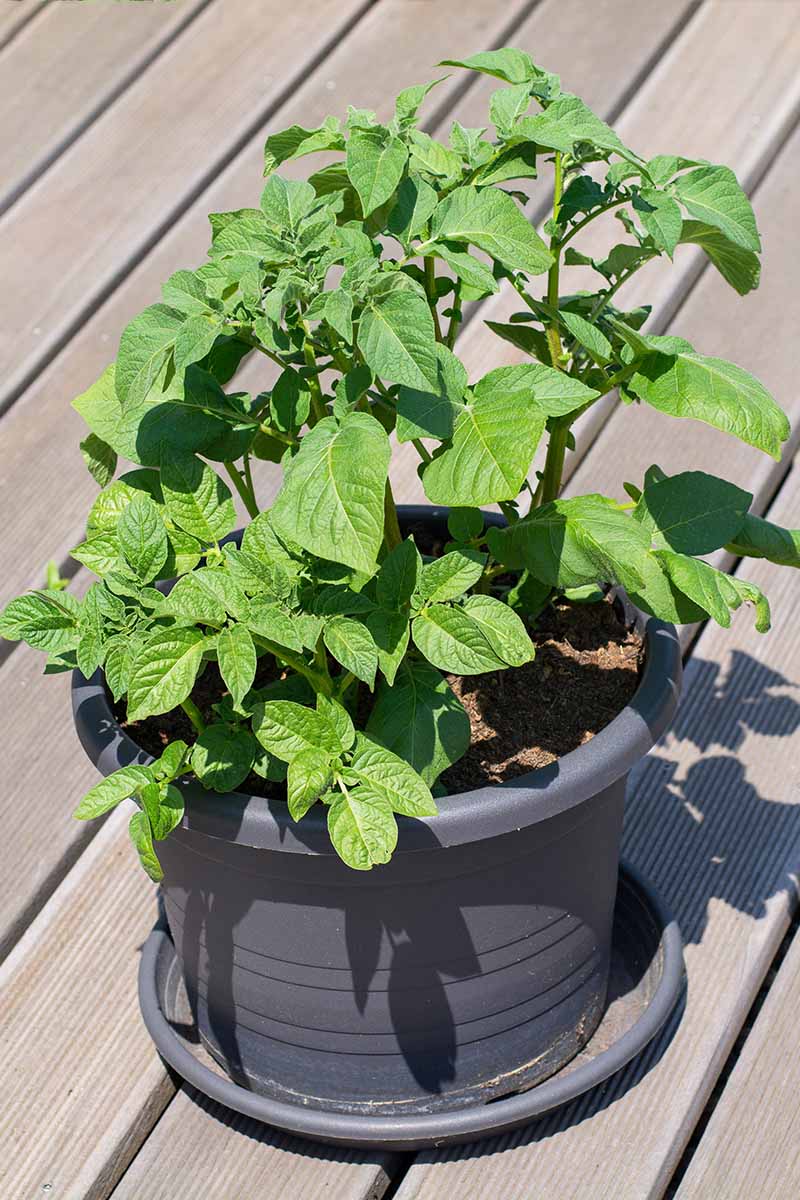
We have seed potatoes in Yukon Gold, Kennebec, Red Pontiac, and Norland Red. 5# bags. Also, I have 3 different kinds of fingerling potatoes. You slice them and plant them as a disc so out of one potato you can get many. “Fingerling” is a popular term used to describe long, thin-skinned, fingerlike potatoes that come in a variety of flavors and colors. ‘Jersey Royal,’ an English heirloom, is renowned for its snowy white flesh and flavor akin to roasted chestnuts. The Dutch red fingerling called ‘Desiree’ has rich yellow flesh and a buttery taste. Blue and purple fingerlings, such as ‘Purple Peruvian,’ have earthy flavors similar to those of mushrooms or walnuts. Because the texture of fingerlings is firm and waxy when cooked, they make an ideal potato for salads and casseroles. Waxy potatoes don’t absorb oil as readily as mealy potatoes, so they don’t go limp in salads or become soggy in casseroles. They’re also great steamed, sautéed and baked. Interesting about planting potatoes in containers. Planting potatoes in pots. I did this last year and got some potatoes. I wondered if I didn’t water enough as they could have been bigger. Give it a try, here is how to plant them. Just a reminder you add dirt as they grow, so they don’t have to push all the way through all that dirt. As you would hill them in the garden, this will give them more dirt to grow. Potatoes set on from the potato set to the top of that. Growing Potatoes in Containers by Robin Sweetser Potatoes can take up quite a bit of space in your garden. One solution is to grow potatoes in containers! Gardeners have had success growing spuds in everything from trash cans to burlap bags. Learn how to plant potatoes in pots and, importantly, how to harvest these tasty little treasures! You can start growing potatoes in pots in early spring! Wait at least two weeks after the last spring frost in your area. See the Almanac’s Frost Calculator. Start With Seed Potatoes If you have never tried growing your own potatoes, nothing could be easier. Pick up some certified seed potatoes at your local garden center. (Seed potatoes are not seeds; they are very small potatoes used to grow potato plants.) They have many colors and types of potatoes to choose from. Many container gardeners do tend to prefer small “new” potatoes in pots versus large russet types. Potato varieties are also distinguished from one another by how soon they are ready for harvest. Early varieties are good because you get your rewards sooner but late varieties will produce higher yields if properly cared for. One rule of thumb is to plant seed potatoes that are about the size of a hen’s egg whole and to cut the larger ones. Types of Containers for Potatoes Any large container can be used for growing potatoes as long as it has good drainage and opaque (and doesn’t let light through). Trash cans are great, especially ones on wheels. Just be sure to drill lots of drainage holes in the bottom and a few inches up the sides. The container needs to be at least 14 inches deep with a 10 to 15 gallon capacity. Avoiding getting much larger as it gets difficult to water evenly. You’ll need five gallons of soil volume for each plant. If your container has a diameter of 20 inches, you can assume 4 plants. How to Fill Containers To fill your container, you’ll want to use half “soilless” potting mix and half well-rotted compost to enrich the soil. You can find bags at garden centers. Never use fresh manure. Also, if you’re not planting in the ground, do NOT use soil. It compacts in a container, doesn’t drain well, causes rotting, and often carries weed seeds or disease. Potting mix retains moisture but also drains well; compost adds fertility. How to Plant Container Potatoes Position your potato pots where they will get 6 to 8 hours of sunshine a day. Fill your container with 4 to 6 inches of soil. Potatoes prefer a slightly acid soil so leave out the lime, which encourages scab. Plant each piece and cover with another 2 inches of soil. Plant pieces 5 to 6 inches apart and 3 to 4 inches away from the sides of the container. As the plants grow, gently add soil around the base of the plants; it is okay to cover some of the leaves as long as the top 2/3 or so of the plant still sticks out of the soil. It is important to keep the stems of the plant covered as they grow because your potatoes grow on short runners which are called stolons that are formed on the sides of the underground stalk. The longer the stalk the more potatoes you’ll get, especially if you are growing a late season variety. How to Feed and Water Container Potatoes Water whenever the top 1 to 2 inches of potting soil feels dry to the touch, and apply enough water for some to escape out of the bottom drainage holes. The aim is for “moist,” not soggy. After the plants have blossomed, potatoes will start to form. When to Harvest Potatoes in Containers If you can easily dig around the plants without disturbing the roots too much you can pick some of these small new potatoes to eat. They’re tender and delicious! Or, wait until the tops of the plants completely die down in the fall to harvest the full crop. Or harvest after the first frost in the fall. If you wish, you can gently tip the entire container or trash can onto a tarp, then gently sift through and unearth those treasures. Do this in a shady area as tubers should not be exposed to light. Don’t be too rough; potatoes can bruise. Also, do not wash your potatoes until you are ready to eat them or you risk rot. Just brush off most of the soil before storing in a dark, cool place such as a basement or root cellar. For a minimum amount of effort you can treat your family to the gourmet delight of home-grown potatoes. Their flavor and texture is far superior to store-bought spuds. Taken from https://www.almanac.com/growing-potatoes-containers Till next time this is Becky Litterer, Becky’s Greenhouse, Dougherty Iowa beckmall@netins.net 641-794-3337 cell 641-903-9365 image from publicdomainpictures.net Opening weekend for the greenhouse, but not very nice weather. Cloudy, windy, cool and chances of storms. I know there will be nicer days to come to the greenhouse. All plants inside for the weekend. Perennials are coming next week because I waited for this weather that was predicted.
I am not complaining as we need rain and moisture, but don’t need storms. Stay safe all. We are open 9-6 Monday through Saturday, 1-6 on Sunday. We have seed potatoes, onion sets, just got in onion plants, fingerling potatoes are here. Cabbage, broccoli, cauliflower look good. Bulk vegetable seeds. Annuals are looking awesome, and some are still growing. Here we go another year…35 years for doing this. What can I say! Glad to be doing this and helping with your garden needs. Till next time this is Becky Litterer, Becky’s Greenhouse Dougherty Iowa beckmall@netins.net 641-794-3337 cell 641-903-9365 image from TheSchottishsun Good morning, it is cool out at 36 degrees at 7:30 AM, but clear, blue sky and not much wind. Going to be a great spring day. High of 61 low tonight of 35. Miracle house “ Greenhouse” is loving this sunlight and when the temperature is around 80 degrees. It is a challenge to keep it that way with lots of fans. Slowly, I am getting the front of the greenhouse cleaned up and ready for the garden center stuff. If you drive by, we have the flats on tall racks yet, not putting them on the long wagon racks till after this weekend, with the storms and rain being predicted.
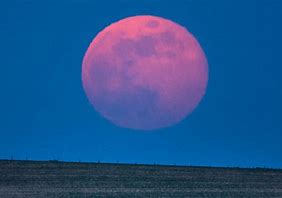
It is my opening weekend, but the weather will play a part in my gardening and yours. Stay safe. Open Saturday 9-6, Sunday 1-6 starting this weekend. Larry and I were coming home from a school program, and we saw the pink moon. Hopefully you did too. It was truly the color in the picture. Nature is just awesome with what it gives us. Here is some information about the pink Moon in April. Prepare for the Full Pink Moon! By Catherine Boeckmann You can see the full Moon in April on Tuesday, April 23. It reaches its brightest point at 7:49 P.M. Learn why we traditionally call it the “Pink Moon” and some fascinating facts and folklore. When to See the Full Moon in April 2024 Venture outside on Tuesday, April 23, to catch a glimpse of April’s full Pink Moon. This full Moon reaches peak illumination at 7:49 p.m. Eastern Time. For the best view of this lovely spring Moon, find an open area and watch as the Moon rises just above the horizon. At this point, it will appear its biggest and take on a golden hue! Why Is It Called the Pink Moon? The full Moon names used by The Old Farmer’s Almanac come from various sources, including Native American, Colonial American, and European sources. Traditionally, each full Moon name was applied to the entire lunar month in which it occurred, not only to the full Moon. Although we wish the name “Pink Moon” had to do with the color of the Moon, the reality is not quite as mystical or awe-inspiring. In truth, April’s full Moon often corresponded with the early springtime blooms of a certain wildflower native to eastern North America: Phlox subulata—commonly called creeping phlox or moss phlox—which also went by the name “moss pink.” Thanks to this seasonal association, this full Moon came to be called the “Pink” Moon! Pink moss phlox, or “moss pink,” lends its nickname to the April Moon. April Moon Facts and Folklore A full Moon in April brings frost. If the full Moon rises pale, expect rain. According to folklore, the period from the full Moon through the last quarter of the Moon is the best time for killing weeds, thinning, pruning, mowing, cutting timber, and planting below-ground crops. Till next time this is Becky Litterer, Becky’s Greenhouse, Dougherty, Iowa beckmall@netins.net 641-794-3337 cell 641-903-9365 image from study.com Good morning, cloudy sky this morning temperature is at 50 degrees at 8:00 AM, high of 65 degrees and low of 45 degrees. Cloudy today, but still a lovely day. BUT we will have wind out of the NW, because of a cold front coming thru. What else but WIND? Stay safe.
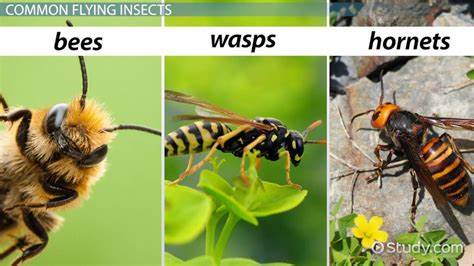
Learn How to Identify Stinging Insects by Robin Sweetser Bzzz… Here’s a secret: all “bees” are not created equal. Bees, wasps, and hornets may look alike and belong to the same order of insects called Hymenoptera, but they are different insects. How can you distinguish between a bee, a wasp, and a hornet? Let’s take a look! Bees and wasps took separate evolutionary paths over 100,000,000 years ago. Bees are vegetarians, collecting pollen to feed their young, while wasps and hornets are carnivores, feeding on other insects. The main thing that they do have in common is that only females can sting. What’s the Difference Between Wasps, Bees, and Hornets? Hornets All hornets are wasps, but not all wasps are hornets. In the U.S., we have no native hornets. Our main hornet is the European hornet, which was introduced to New York in 1840. It looks like a large yellowjacket—about ¾ to 1½ inches long—and nests in the ground or in hollow trees. Beneficial Insects in the Garden Native Bees: The Best Pollinators for Your Garden Another “hornet” we commonly encounter is the bald-faced hornet, a type of paper wasp closely related to the yellowjacket. They are black with white markings on their face and abdomen. You have probably seen their huge, gray, basketball-sized nests swinging high in a tree. A new hornet that was recently introduced to the West Coast got a lot of press a few years ago. The Asian giant hornet is also called the “murder hornet” for the way they attack honey bee colonies, killing the bees by ripping off their heads, eating the honey, and stealing the larva to feed to their own young. They are the giants of the wasp world, measuring 2 inches long. In Japan, they are called sparrow wasps since they resemble small birds in flight. Their sting is very painful to humans, and about 50 unlucky people a year are killed by the deadly neurotoxin contained in their venom. Wasps Although there are many solitary wasps, such as digger wasps and mud daubers, most wasps are considered social, meaning that they live in colonies with a queen, female worker bees, and drones, like honeybees. Solitary wasps nest in the ground or in natural cavities, while social wasps attach papery nests made from chewed fibers to tree limbs or the eaves of your house. The honeycomb structure of a large, above-ground paper wasp nest. Although they look like yellow jackets, they are not! Yellowjackets are much smaller. The yellowjacket is a social wasp that will nest above or below ground. In the fall, all the social wasps die off—except for the fertilized queens. They overwinter in protected spots such as hollow logs, under loose tree bark, or in a soil cavity and emerge in the spring to start a new colony. Solitary wasps depend on their larvae to mature in spring and start a new generation. Are Hornets and Wasps “Bad Bugs”? No! Wasps are very important, playing a vital ecological role in controlling pests. Social wasps are predators, collecting insects such as caterpillars, grubs, grasshoppers, aphids, and flies, which are stung, paralyzed, and put into the egg chambers for newly hatched larvae to eat. Wasps also prey upon spiders; the blue mud dauber’s preferred meal is the black widow! Since wasps prey on some bad bugs, they should be considered beneficial to gardeners. Adults feed on nectar, doing some accidental pollinating simultaneously, so they are minor pollinators. On the other hand, they are drawn to meat and sweets and scavenge whatever they find, so they can be a nuisance for outdoor dining and will congregate around trash cans. If you encounter them, don’t swat at them or act aggressively, or you risk being stung. They will also sting to protect their hive. If you should accidentally mow over a ground nest—run! Unlike honey bees, who can only sting once, wasps are capable of stinging multiple times. Bees eat pollen and nectar, feeding it to their young. This makes them important pollinators. Bees look furry because they are covered with branched, feather-like hairs that pollen clings onto. Bees are not aggressive and only sting in self-defense. In fact, the male bees have no stinger. With the exception of honey bees and bumblebees, most bees are solitary and live in underground nests. Each female takes care of her eggs and gathers pollen to feed the larvae when they hatch. There are about 4,000 species of bees native to the U.S. and Canada Identifying Bees, Wasps, and Hornets at a Glance Bees have a wide, hairy body and stout legs and lose their stinger when they sting. Wasps and hornets have skinny bodies with narrow waists. Their bodies are mostly hairless and can sting multiple times. Of course, there are many kinds of bees. Most of us grew up learning about the sophisticated social structures of honey bees and bumblebees, and we’ve come to think that their lifestyle represents all bee behavior. The truth is that the world is home to more than 20,000 species of bees, and a whopping 90% of them do not live together in hives. Our native solitary bees—such as mason bees and leafcutter bees—which are most vital to our flowers and food. Learn more about these amazing heroes of pollination—and see how to bring these docile native bees to your garden. The Life Cycle of Bees, Wasps, and Hornets Whether bee, wasp, or hornet, the basic life cycle is the same—egg, larva, pre-pupa, pupa, adult. Fertilized eggs produce female bees, while unfertilized ones produce males. Eggs are placed in individual nest cells and provisioned with a food source for the newly hatched larvae to eat—a loaf made of pollen and nectar for bees or a paralyzed insect for wasps. Some eggs hatch in a few days, while others wait until the next season to emerge. The larvae eat, grow, and molt their skin up to 5 times. The pre-pupal stage can last a long time. An egg laid in the spring can take all summer to reach the pre-pupal stage, and then it can stay that way all fall and winter. Some bees remain pre-pupal for several years! The pupa looks like an adult but is pale in color and has no wings or hair. In a short time, it chews its way out of the nest as an adult. Wasps, Bees, and Hornets are Beneficial Most bees, wasps, and hornets are beneficial. Both wasps and hornets are real workhorses for pest management in the garden and farm, feeding on the “bad” insects that destroy crops. In fact, if you were able to see many of their nests, they’re stocked with paralyzed adult grasshoppers, crickets, caterpillars, and sawflies. Learn 10 Ways to Help Pollinators Also, if you look carefully at the garden, wasps are very helpful pollinators! They are usually solitary and non-aggressive, busily hovering and moving from flower to flower. There are so many Beneficial Insects in the Garden! None of these beneficial insects should be killed unless their nest is close to humans and is creating a hazard. For example, we had bald-faced hornets make a nest next to our front door, and every time the door opened or closed, they were ready to fight! Needless to say, that nest had to go. We waited until after dark when the bees had all returned to the nest and sprayed an aerosol wasp killer into the entrance hole. After a few days of seeing no activity, we were able to remove the nest. For ground-nesting wasps and hornets, locate the entrance hole, spray into the opening, and plug the hole with a large rock. Don’t try to burn or drown a nest with water. That just makes them mad! When attempting any eradication of nests, be sure to dress appropriately, covering your eyes and all bare skin (just in case). Also, be sure to have an escape route planned! Otherwise, pause before you kill these insects; remember that they are a beneficial part of our ecosystem and especially critical for pest control in our gardens, public lands, and croplands. Do you see wasps, hornets, and bees in your garden? Taken from https://www.almanac.com/wasps-bees-and-hornets-whats-difference Till next time this is Becky Litterer, Becky’s Greenhouse, Dougherty Iowa beckmall@netins.net 641-794-3337 cell 641-903-9365 |

AuthorHi! My name is Becky and I am a Master Gardener. I own Becky's Greenhouse in Dougherty, Iowa. Archives
March 2024
Categories |


 RSS Feed
|